✡️How to make polygon image mask
● 14 Feb 2015
We all as iOS developer must have used cornerRadius property in CALayer to make our UIImageView to be round or circle according to the design from designer. But what if the designer want someting more than that, polygon? star?, what should we do.
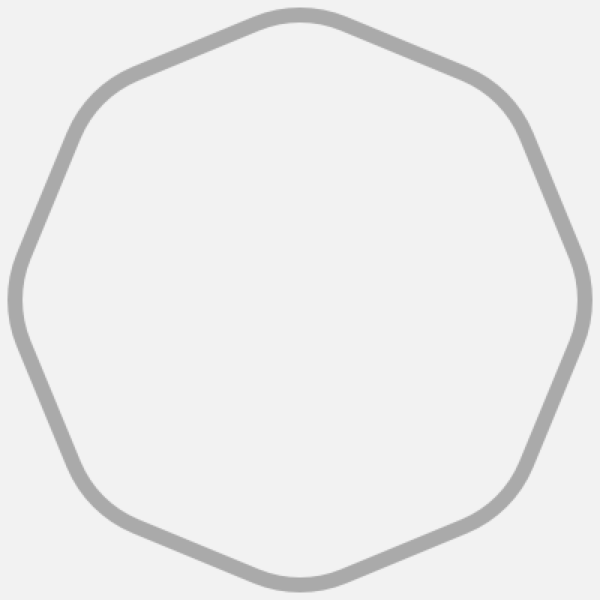
This blog will show you how to use UIBezierPath to make a dynamic polygon to be mask for UIImageView like this
Create Path
Let’s create new swift playground file so we can see the updates when we made changes to the code and then create the custom UIView subclass to show our path in drawRect() method.
import UIKit
import Darwin

class CustomView: UIView {

    override func drawRect(rect: CGRect) {
        // draw bezier here
    }

}

let view = CustomView(frame: CGRectMake(0, 0, 400, 400))
1. Declare the constants.
Put the following lines to our class.
let count = 8
let inset: CGFloat = 10
let lineWidth: CGFloat = 10
let lineColor = UIColor.lightGrayColor()
count is the number of angles in polygon.
inset is the view padding size.
lineWidth is the size of the path line.
And put the following lines to drawRect()
let insetRect = CGRectInset(rect, inset, inset)
let radius = (insetRect.width > insetRect.height ? insetRect.height : insetRect.width) / 2.0
let center = CGPoint(x: CGRectGetMidX(insetRect), y: CGRectGetMidY(insetRect))
let radian = CGFloat(M_PI * 2) / CGFloat(count)
radius because our polygon base on shape of circle, so we need to know the radius.
center center of the view and circle.
radian the radian value per angle. The complete circle need 2π radian, so the radian per angle will be 2π / number of angle.
2. Create a bezier path
Put the following lines to drawRect:
let path = UIBezierPath()
path.lineWidth = lineWidth
lineColor.setStroke()
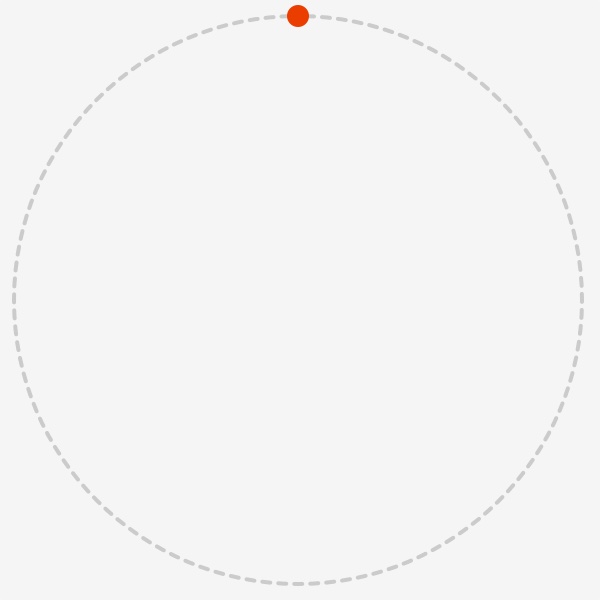
Then move the start point to middle top using center.y value by substract with radius.
let startPoint = CGPointMake(center.x, center.y - radius)
path.moveToPoint(startPoint)
Now we are at the red dot.
Next, we need to draw lines to make polygon. Let’s start with first destination.
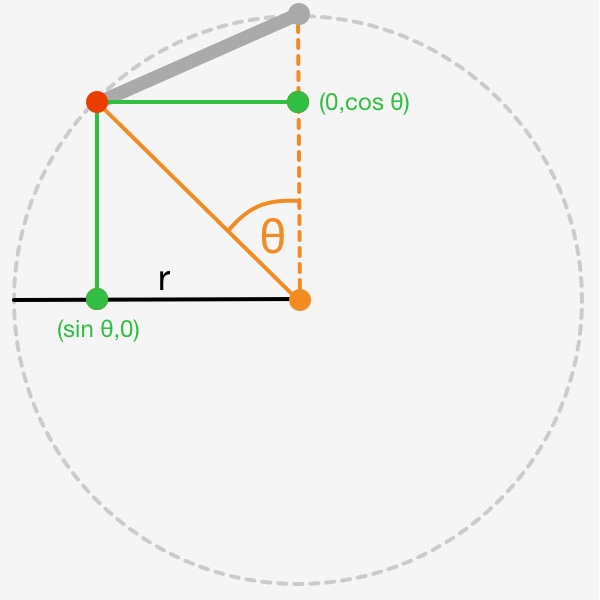
In order to draw a line, we need point (x,y) and angle (θ). According to the Apple document, Angles in default coordinate is:
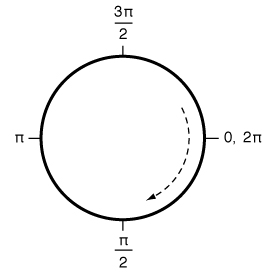
So angle (θ) is equal to:
let θ = CGFloat(3 * M_PI_2) - radian
and the point (x,y) is equal to:
let point = CGPoint(
    x: center.x + radius * cos(θ),
    y: center.y + radius * sin(θ)
)
As you can see in the following image.
Let’s use those values in the for-loop and draw path!
for i in 1...count  {
    let θ = CGFloat(3* M_PI_2) - CGFloat(i) * radian

    let point = CGPoint(
        x: center.x + radius * cos(θ),
        y: center.y + radius * sin(θ)
    )

    path.addLineToPoint(point)
}

path.stroke()
See the result.

But something is missing, yeah the curve at every corners.
3. Add curves
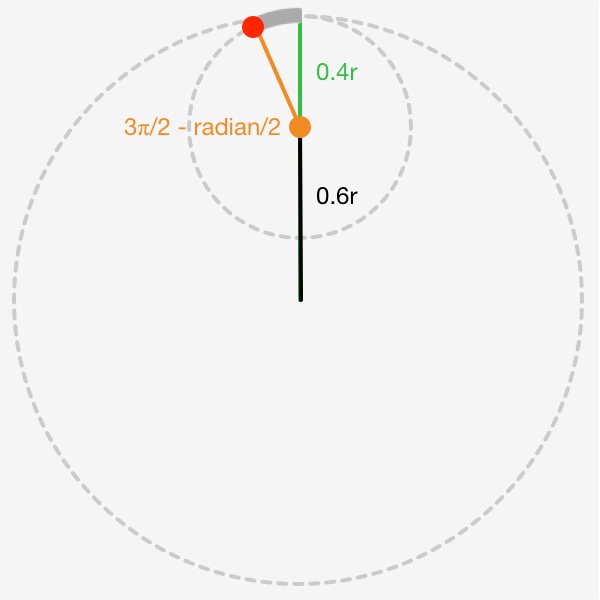
Back to starting point where we was at red dot. We need to draw curves that are a part of circle, so imagine we have small circle inside at every angle.
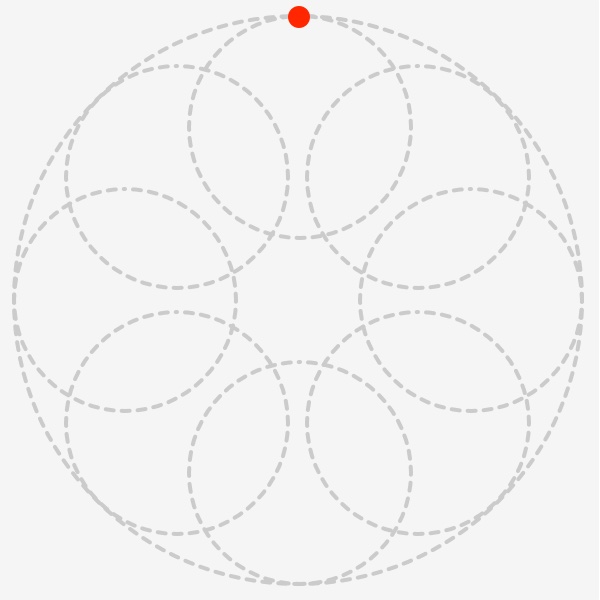
Because we are at the center and top of the circles, we will add first curve with half radian (every small circle also use same radiant value as bigger one because total radian will be equal to 2π or 360 degree) and in order to add curve we need the control point which is the center of the small circle.
Add constants as following lines before for-loop
let subRadius = radius * 0.4
let firstControlPoint = CGPoint(x: startPoint.x, y: startPoint.y + subRadius)
You can adjust subRadius ratio multiplier if you want the angle to have more curve or sharp. Put the following lines above for-loop to add a curve into our path before we got into the loop.
path.addArcWithCenter(firstControlPoint,
    radius: subRadius,
    startAngle: CGFloat(3 * M_PI_2),
    endAngle: CGFloat(3 * M_PI_2) - radian / 2,
    clockwise: false)
As you can see in the following image.
Let’s go into for-loop for the rest of remaining small circles. After declaration of θ and point put these lines to find the control point for particular angle and we have to use 0.6 as multiplier for radius because we used 0.4 for subRadius
let controlPoint = CGPoint(
    x: center.x + (radius * 0.6) * cos(θ),
    y: center.y + (radius * 0.6) * sin(θ)
)
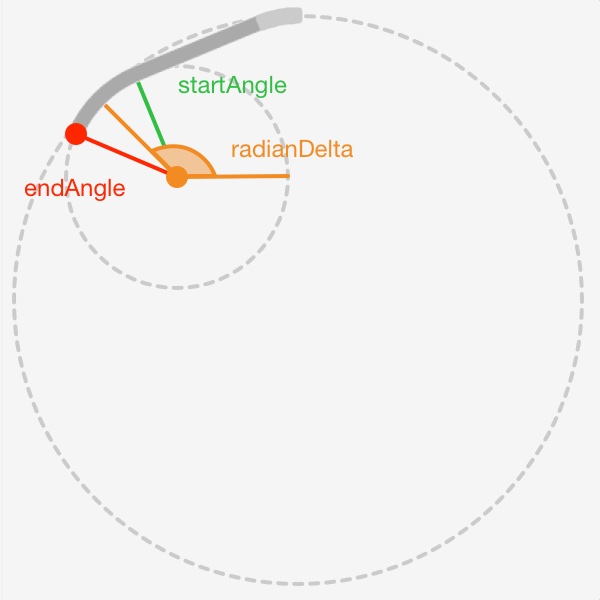
Also we need to know radian of the point that touch the small circle by use atan2 function. The function take 2 arguments which is distance of point y and x to the center of circle and return the radian. You can read more about it at https://en.wikipedia.org/wiki/Atan2
let deltaY = point.y - controlPoint.y
let deltaX = point.x - controlPoint.x
let radianDelta = atan2(deltaY, deltaX)
Then we need to find angle that the curve will start and end with using the radian that we got from atan2.
var startAngle = radianDelta + (radian / 2)
var endAngle = radianDelta - (radian / 2)
Remove path.addLineToPoint(point) we will use addArcWithCenter() again. It will automatically draw a line if current point is not in the curve of control point, so we do not need to draw straight line.
path.addArcWithCenter(controlPoint,
    radius: subRadius,
    startAngle: startAngle,
    endAngle: endAngle, clockwise: false)
As you can see in the following image.
See the result.
4. Apply mask to UIImageView
Now we have a working polygon bezier path, next we need to create subclass of UIView to wrap the UIImageView inside and use the path to do a mask by following code.
let maskLayer = CAShapeLayer()
maskLayer.path = path.CGPath
imageView.layer.mask = maskLayer
Conclusion
We can use this to create many styles of UIImageView by change the value of count or even re-write the path to make star or what ever you want. Do not stick with the square only. You can see the complete source code at Github.