📶Playing with Estimote Beacon
● 04 Aug 2014
I just got a new project which is using Estimote. I cannot write about the purpose of this app but I will write about what it is and example to use it.
What is Estimote Beacon ?

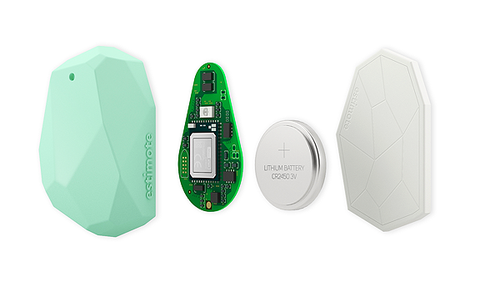
An Estimote Beacon is a small, wireless device, sometimes also called a ‘mote’. When placed in a physical space, it broadcasts tiny radio signals to smart devices. — from estimote website
So basically it is a small device that broadcasts a radio signal. But what is that signal and how does it work?
Estimote Beacon broadcasts signal using Bluetooth LE and iBeacon standard which is implement using Bluetooth’s Proximity sensing specification. You can think of it as a someone who keeps shouting “Hey, I am here. My name is …“ every second.
Estimote Beacon broadcasts signal with the following significant data:
Proximity UUID: B9407F30-F5F8-466E-AFF9-25556B57FE6D
Major: 1234
Minor: 5678
Proximity UDID : Unique identifier of the beacon. As default, the value will be the same for all devices that comes from Estimotes but you can change it later.
Major : Most significant value of beacon. You can use it as group number.
Minor : Least significant value of beacon. You can use it as member number in group.
Development
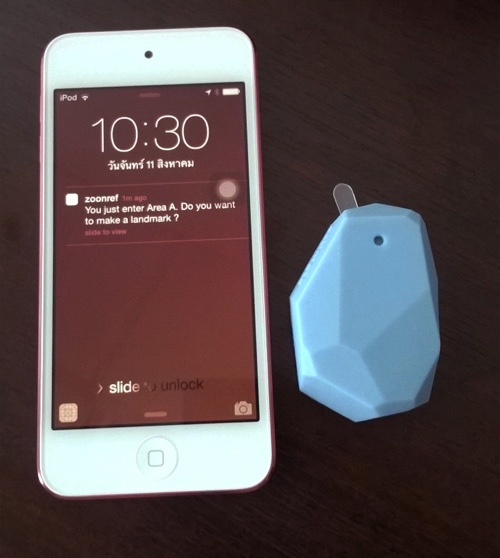
The main concept of this app is to notify the user when the phone is close to any of Estimote devices and the notification must include the information that can indicate which device user is close to. For example, if the phone is close to area A, the phone will get the notification like “You just got into area A, Do you want to make a landmark ?”.
Let’s start coding.
Setup
We need to install Estimote SDK to our project. You can see the instruction from here.
Permission in iOS8
After you have created project and setup, the first thing you need to do if you are going to support iOS8 is request permission to use location service due to policy changed. Add the following code to anywhere depends on when you want user to see alert dialog but need to call it before using any estimote function.
// request access to location
if ([self.locationManager respondsToSelector:@selector(requestAlwaysAuthorization)]) {
	[self.locationManager requestAlwaysAuthorization];
}
The reason why I used responseToSelector function is because requestAlwaysAuthorization is not available prior to iOS8. We need to check it first before calling it.
Then you have to add key NSLocationAlwaysUsageDescription in the info.plist file with the text value which user will see when alert dialog pop up.
Do not forget to create locationManager as a instance property otherwise, the alert box will disappear before you can take any action, because the locationManager object get released at the end of the function.
Area Definition
Next we are going to create Area class to hold our beacon informations.
@interface Area : NSObject

@property (nonatomic, strong) NSNumber *id;
@property (nonatomic, copy) NSString *name;
@property (nonatomic, copy) NSString *estimoteMajor;
@property (nonatomic, copy) NSString *estimoteMinor;

@end
id : The ID of the area, we will use it for reference later.
name : Name of Area.
estimoteMajor and estimoteMinor : The values that can indicate which device associate with this area.
Next step is to create list of areas in viewDidLoad of the root ViewController. For example, we have 3 areas to notify.
// create areas
Area *areaA = [Area new];
areaA.id = @1;
areaA.name = @"Area A";
areaA.estimoteMajor = @"18407"; // your estimote major value
areaA.estimoteMinor = @"25511"; // your estimote minor value

Area *areaB = [Area new];
areaB.id = @2;
areaB.name = @"Area B";
areaB.estimoteMajor = @"9680";
areaB.estimoteMinor = @"30624";

Area *areaC = [Area new];
areaC.id = @3;
areaC.name = @"Area C";
areaC.estimoteMajor = @"21137";
areaC.estimoteMinor = @"19658";
self.areas = @[areaA,areaB,areaC];
Start Monitoring
We will use class ESTBeaconManager to manage all of our Estimote Beacon tasks and use class ESTBeaconRegion to define which region we want to monitor. Put the following code in viewDidLoad.
self.beaconManager = [[ESTBeaconManager alloc] init];
self.beaconManager.delegate = self;

self.beaconRegion = [[ESTBeaconRegion alloc] initWithProximityUUID:ESTIMOTE_PROXIMITY_UUID  identifier:@"Anything"];
[self.beaconManager startMonitoringForRegion:self.beaconRegion];
ESTIMOTE_PROXIMITY_UUID is a fixed UDID for all Estimote Beacon device. If you happen to change it, you have to change this value to match with yours.
Then implement ESTBeaconManager delegate:
#pragma mark - ESTBeaconManager delegate

- (void)beaconManager:(ESTBeaconManager *)manager didEnterRegion:(ESTBeaconRegion *)region
{
   // phone enter to area
	UILocalNotification *notification = [UILocalNotification new];
	notification.alertBody = @"Enter region notification";
	[[UIApplication sharedApplication] presentLocalNotificationNow:notification];
}

- (void)beaconManager:(ESTBeaconManager *)manager didExitRegion:(ESTBeaconRegion *)region
{
	// phone exit from area
	UILocalNotification *notification = [UILocalNotification new];
	notification.alertBody = @"Exit region notification";
	[[UIApplication sharedApplication] presentLocalNotificationNow:notification];
}
Method startMonitoringForRegion: is working even the app is in background state but not when you kill the app.
Now we will get notification when the phone is close to one of those 3 areas and also when exit the area (please note that the exit delegate will get called after 30 second). But wait, How can we know that we got into which area, A, B or C. The solution is we have to use another method that is startRangingBeaconsInRegion: but we will get new problem, this method does not support in background mode.
The solution is we will use startMonitoringForRegion: first and after beaconManager:didEnterRegion: get called, we have 5 seconds that iOS allow the app to execute code in background. With that 5 seconds we will use startRangingBeaconsInRegion: to get which beacon device we are close to.
The delegate code will be like this:
#pragma mark - ESTBeaconManager delegate

- (void)beaconManager:(ESTBeaconManager *)manager didEnterRegion:(ESTBeaconRegion *)region
{
    [self.beaconManager startRangingBeaconsInRegion:self.beaconRegion];
}

- (void)beaconManager:(ESTBeaconManager *)manager didRangeBeacons:(NSArray *)beacons inRegion:(ESTBeaconRegion *)region
{
    ESTBeacon *beacon = (ESTBeacon *)beacons.firstObject;
    Area *detectedArea = nil;
    for (Area *area in self.areas) {
        if (beacon.major.intValue == area.estimoteMajor.intValue &&
            beacon.minor.intValue == area.estimoteMinor.intValue) {
            detectedArea = area;
            break;
        }
    }

    if (detectedArea) {
        UILocalNotification *notification = [UILocalNotification new];
        notification.alertBody = [NSString stringWithFormat:@"You just enter %@. Do you want to make a landmark ?",detectedArea.name];

        [[UIApplication sharedApplication] presentLocalNotificationNow:notification];
        [self.beaconManager stopRangingBeaconsInRegion:self.beaconRegion];
    }
}
Now when the app is in the background or the phone is locked, we will get notification with the area name.

Conclusion
With Estimote Device and iBeacon, we can use it to empower ideas based on indoor location or proximity such as Retail Shop that will notify user about the promotion when you are close to the product or Check-in app.